A Step by Step Guide How to Air Filter Swap
Keeping your ride in top-notch shape is all the rage these days to ensure it stays at peak performance. We’re going to let you in on a not-so-secret secret: the air filter is a total game-changer. Yeah, that’s right! This often overlooked, but hella important maintenance move keeps your engine cruising smoothly by blocking out all the nasty stuff like dust and dirt. Swapping out your air filter is a simple but super effective way to keep your engine purring like a content cat and sipping fuel like a pro. Buckle up as we take you through the air filter swap, step by step!
Why Bother with the Air Filter Swap?
Before we dive into the nitty-gritty of air filter swapping, let’s break down why it’s such a big deal. The air filter in your ride does a critical job by sieving out all the gunk from the air that flows into the engine. Over time, it gets clogged with dirt, dust, and other nasties, causing problems like:
- Dwindling Gas Mileage: A clogged air filter plays hard to get with airflow, making your engine hustle for air. This extra effort translates to worse gas mileage and a wallet-draining fuel bill.
- Weak Sauce Engine: A filthy filter throttles the clean air supply, making your engine feel lazy and reluctant. Your ride might as well take a nap.
- Dirty Emissions: An inefficient engine thanks to a grubby air filter can lead to higher emissions. That’s not just bad for your green conscience but also for passing those smog tests.
- Engine Catastrophe: In rare cases, a mega-clogged filter can invite debris into the engine, and that’s like throwing a party for disaster.
Now that we’ve got the lowdown on why air filter swaps are a must, let’s get down to the play-by-play on how to work this magic.
Read Also: How to Check Your Car’s Engine Coolant
Step 1: Assemble Your Arsenal
Before you start the air filter swap dance, gather your squad of tools and gear. You’ll need:
- A Brand New Air Filter: Make sure it’s the one that’s all about your car’s make and model. Check your car’s instruction manual or hit up the carmaker for the deets.
- A Screwdriver (if you roll with that crew): Some air filter spots have screws holding things together, so you might need a trusty screwdriver.
- Safety Shades and Gloves: Keep those eyes and hands safe, people! It’s all fun and games until someone loses an eye or gets dirt under their nails.
- Rags or Paper Towels: For cleaning up any mess around the air filter zone.
Step 2: Track Down the Air Filter Lair
The air filter’s hideout is usually under the hood. Consult your car’s bible (owner’s manual) or look for a plastic box with a hose connected to it. This box should be chilling somewhere between the engine and the front grille.
Step 3: Bust Open the Air Filter Padlock
To get at the air filter, you’ve got to pop open its lair. The method might vary depending on your ride, but here are two common approaches:
Clips or Latches: If your air filter crib is held together with clips or latches, give them a friendly release and pop the box open.
Screws: If your filter box is all about screws, whip out the right screwdriver to break them free. Keep those screws safe, though – you’ll need them to put the box back together later.
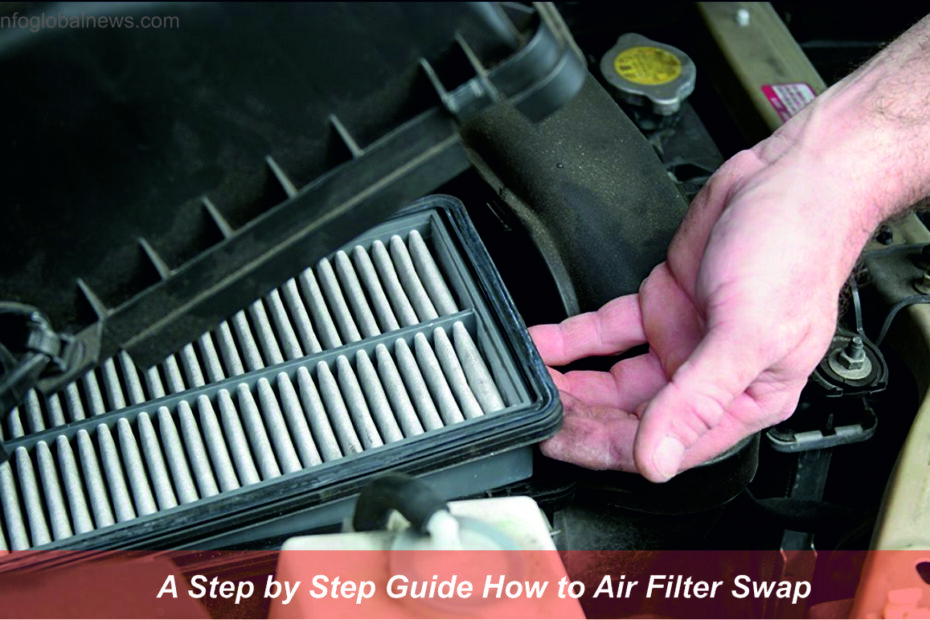
Step 4: Say Goodbye to the Old Air Filter
Once the box is open, gently escort the old air filter out. Pay attention to how it was chilling in there because you’ll need to recreate the setup with the new filter. If the old filter is playing hard to get, handle it gently to avoid any drama.
Step 5: Give the Old Air Filter Some TLC
Give the old filter a little love and attention. Hold it up to the light and check for any dirt, damage, or signs of wear and tear. If it’s looking grimy or worse for wear, it’s time to break up with it.
Step 6: Tidy Up the Air Filter Den
Before sliding in the new filter, give the air filter crib a quick once-over. Use a rag or paper towel to get rid of any loose dirt and debris. A clean crib means no unwanted guests for your engine once the new filter moves in.
Step 7: Welcome the New Air Filter to the Party
Gently place the new air filter into its new home, making sure it’s all snug. Pay attention to any arrows or markings on the filter, which show the right direction for the airflow. Be easy with it to avoid any drama with the crib or the filter itself.
Step 8: Lock Up the Air Filter Crib
If your filter crib is all about clips or latches, put them back in place. If screws were the gatekeepers, use those same screws to put the box back together. Seal it up tight so no unfiltered air gets any ideas about sneaking in.
Step 9: Give It One Last Look-See
Do a quick double-check to make sure the air filter is settled and the crib is on lockdown. Also, sweep the area for any tools that might have snuck into the engine bay.
Step 10: Fire Up the Engine
With the new air filter in its groove and everything locked down, start your car’s heart (the engine). Listen for any funky sounds and keep an eye on how it’s running. A well-placed air filter should make your engine run smoother than a buttered-up slip ‘n slide.
Swapping out your air filter is a rad but super important move to keep your ride revved up and ready for action. Making this part of your regular maintenance routine means better gas mileage, a peppier engine, and greener emissions. Just follow our step-by-step jam, and you’ll be an air filter swapping pro. Don’t underestimate this small but major player in keeping your ride in top form. It’s all about that clean air and that sweet, sweet performance.
May you also like: